Integration: Allocate and manifest
Use Ship’s classic integration design to create, allocate, label, and manifest shipments. Ideal for simple, scheduled carrier collections with static delivery promises.
Integration design for Allocation and manifesting
Creating a new shipment, allocating it to a scheduled carrier service, and then adding it to that service’s manifest is perhaps Sorted Shipment’s most basic use case. The Allocate and Manifest integration design makes it easy for your organisation to manage deliveries across multiple carriers.
The Allocate and Manifest design is most useful to your business if:
- You have a warehouse / fulfilment centre from which your carriers make regular, scheduled collections.
- You use a static delivery promise (e.g. Next day delivery before 5pm).
- You want to keep your business logic and technology architecture as simple as possible.
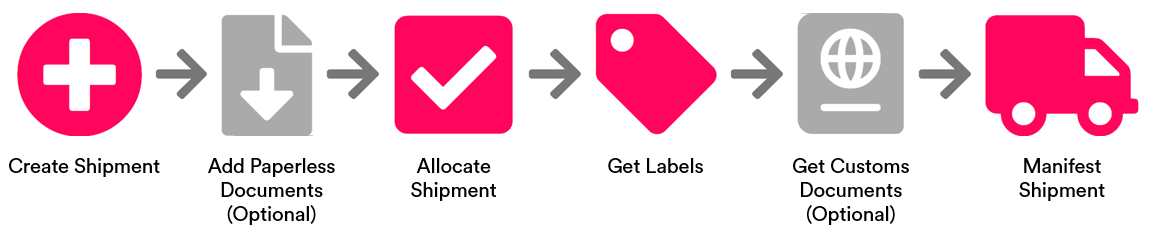
There are six steps to the design:
- Create the shipment - Use the Create Shipment endpoint to record the details of your new shipment.
- (Optional) Add Paperless Documents - Use the Add Paperless Document endpoint to add documents to the shipment’s data.
- Allocate the shipment - Use the Allocate Shipment endpoint to assign your shipment to a suitable carrier service.
- Get the shipment’s labels - Use the Get Labels endpoint to get the delivery label for your shipment.
- (Optional) Get customs documents for the shipment - Use the Get Customs Documents to generate printable customs documents for international shipments.
- Manifest the shipment - Use the Manifest Shipment endpoint to send shipment data to the selected carrier.
This section gives more detail on each step of the design and provides worked examples.
Step 1: Create the shipment
POST https://api.sorted.com/pro/shipments
The first step toward manifesting a shipment is to create that shipment using the Shipments API.
Shipments are created using the Create Shipment endpoint, which takes information about new shipments, adds them to the database, and returns a link to the newly-created shipment, including its {reference}. A newly created shipment has a {state} of unallocated.
As a minimum, the Create Shipments endpoint requires you to send details of the contents of the shipment and its origin and destination addresses. You must also specify whether the shipment is on_demand (i.e. will require an ad-hoc carrier collection to be booked) or scheduled (i.e. will be picked up as part of a regularly scheduled carrier collection).
For full reference information on the Create Shipment endpoint, see the Create Shipment page of the API reference.
For a user guide explaining the Create Shipment endpoint, see the Creating Shipments page.
Create shipments example
This example shows the creation of a fairly standard shipment. In this case, we have an outbound shipment comprising a single package.
After receiving the request, Shipments API returns a {reference} of sp_00595452779180472847666078547968. Many of Shipment’s functions require you to provide this shipment {reference} as a parameter.
POST https://api.sorted.com/pro/shipments
{
    "shipment_type": "on_demand",
    "contents": [
        {
            "custom_reference": "b9fa91b0-0dd0-4dd5-986f-363fa8cb2386",
            "package_size_reference": null,
            "weight": {
                "value": 2.40,
                "unit": "Kg"
            },
            "dimensions": {
                "unit": "Cm",
                "width": 15.0,
                "height": 15.5,
                "length": 20.0
            },
            "description": "Jeans",
            "value": {
                "amount": 8.99,
                "currency": "GBP"
            },
            "sku": "SKU09876",
            "model": "MOD-009",
            "country_of_origin": "PT",
            "harmonisation_code": "09021000",
            "shipping_terms": "fca",
            "quantity": 2,
            "unit": "Box",
            "metadata": [
                {
                    "key": "Category",
                    "value": "Menswear",
                    "type": "string"
                }
            ],
            "label_properties": null,
            "Contents": null
        }
    ],
    "addresses": [
        {
            "address_type": "Origin",
            "contact": {
                "reference": "co_9953035290535460864",
                "title": "Mr",
                "first_name": "Mark",
                "last_name": "Brunell",
                "contact_details": {
                    "mobile": "+447495747987",
                    "email": "mark@62-7.com"
                }
            },
            "property_number": "1",
            "property_name": "Frank's Place",
            "address_line1": "Zappa Avenue",
            "address_line2": "Off Rock Road",
            "address_line3": "Off Heavy Crescent",
            "locality": "Manchester",
            "region": "Greater Manchester",
            "postal_code": "M2 6LW",
            "country_iso_code": "GB"
        },
        {
            "address_type": "destination",
            "custom_reference": "21bbd58a-6dec-4097-9106-17501ddca38d",
            "contact": {
                "reference": "co_9953035290535460865",
                "title": "Mr",
                "first_name": "Gardner",
                "last_name": "Minshew",
                "middle_name": null,
                "position": null,
                "contact_details": {
                    "landline": null,
                    "mobile": "+447495747987",
                    "email": "gminshew@test.com"
                }
            },
            "property_number": "8",
            "property_name": null,
            "address_line1": "Norbert Road",
            "address_line2": "Bertwistle",
            "address_line3": null,
            "locality": "Preston",
            "region": "Lancashire",
            "postal_code": "PR4 5LE",
            "country_iso_code": "GB",
            "lat_long": null
        }
    ]
}
  {
  "reference": "sp_00595452779180472847666078547968",
  "message": "Shipment created successfully",
  "_links": [
    {
      "href": "https://api.sorted.com/pro/shipments/sp_00595452779180472847666078547968",
      "rel": "shipment",
      "reference": "sp_00595452779180472847666078547968",
      "type": "shipment"
    }
  ]
}
Step 2 (optional) Add paperless documents
Add paperless document endpoint
POST https://api.sorted.com/pro/documents/paperless/{shipment_reference}
Paperless documents are customer-generated documents that are transmitted to carriers as part of a shipment’s data, as opposed to being generated separately by the carrier. They can help to make your workflows more efficient, reducing steps in the manifest process and enabling you to attach document data to a shipment directly.
Paperless documents functionality should not be confused with Shipment API’s customs documents functionality. Paperless documents are added to the shipment before allocation and transmitted as part of that shipment’s data, while customs documents are generated post-allocation and are intended to be printed before dispatch. For more information on working with customs documents, see the Getting Shipment Documents page. Not all carriers support paperless trade.
file_format, document_type, and file_content (as a base64-encoded byte array). You can also add expiration and usage data if required.Once it has received the request, the Shipments platform attaches the document to the specified shipment and returns a unique reference for the paperless document. You can use this reference to retrieve details of the paperless document (via the Get Paperless Document endpoint), or delete the paperless document entirely (via the Remove Paperless Document endpoint).
For full reference information on the Add Paperless Document endpoint, see the Shipments API Reference.
For a user guide on working with paperless documents, see the Adding Paperless Documents page.
Add paperless document example
The example shows a successful request to add a commercial_invoice paperless document to shipment sp_00595452779180472847666078547968. Shipments has responded with a paperless document reference of pd_00797582543150236528252876881920.
Example add paperless document request
POST https://api.sorted.com/pro/documents/paperless/sp_00595452779180472847666078547968
  {
  "file_format": "pdf",
  "document_type": "commercial_invoice",
  "expiration": "2021-09-01T06:00:00+00:00",
  "file_content": (Base64 document data),
  "usage": "electronic_trade"
}
Example add paperless document response
  {
    "reference": "pd_00797582543150236528252876881920",
    "message": "Paperless Document pd_00797582543150236528252876881920 added successfully",
    "_links": [
        {
            "href": "https://api-int.sorted.com/pro/documents/paperless/pd_00797582543150236528252876881920",
            "rel": "self",
            "reference": "pd_00797582543150236528252876881920",
            "type": "paperless_document"
        },
        {
            "href": "https://api-int.sorted.com/pro/shipments/sp_00797580869643167594270016798720",
            "rel": "shipment",
            "reference": "sp_00797580869643167594270016798720",
            "type": "shipment"
        }
    ]
}
Step 3: Allocate the shipment using default rules
PUT https://api.sorted.com/pro/shipments/{reference}/allocate
To allocate a shipment based on your organisation’s custom allocation rules, use the Allocate Shipment endpoint. Shipments enables you to configure custom allocation rules for individual carrier services - such as valid package dimensions, maximum shipment value, and geographical availability - via the UI.
Once the request is received, the Shipments platform uses your shipping rules and modes to ascertain the most suitable carrier service for the shipment, and then allocates the shipment to that service. The system then returns an Allocate Shipments Response.
For more information on the wider process Shipments uses to allocate shipments, see the Selecting a Carrier Service section of the Allocating Shipments page.
For more information on configuring and using shipping rules, see the Managing Shipping Rules page of the UI user guide. * For more information on configuring and using shipping modes, see the Managing Shipping Modes page of the UI user guide.
Allocate shipments with default rules example
The example shows a successful request to allocate a shipment with a {reference} of sp_01017652898121961272041674506240 via the Allocate Shipment endpoint. Shipments has selected a service and returned tracking_references for the shipment.
PUT https://api.sorted.com/pro/shipments/sp_01017652898121961272041674506240/allocate
  {
    "shipment_reference": "sp_01017652898121961272041674506240",
    "state": "allocated",
    "price": {
        "net": 2.00,
        "gross": 2.00,
        "taxes": [
            {
                "rate": {
                    "reference": "FF_DPD_Next_Day_103386",
                    "country_iso_code": "GB",
                    "type": "Zero",
                    "value": 0.0000
                },
                "amount": 0.000000
            }
        ],
        "currency": "GBP"
    },
    "message": "Shipment sp_01017652898121961272041674506240 has been allocated successfully",
    "carrier": {
        "reference": "FF_103386_DPD",
        "name": "DPD",
        "service_reference": "FF_DPD_Next_Day_103386",
        "service_name": "DPD Next Day (Parcel)"
    },
    "tracking_details": {
        "contents": [
            {
                "reference": "sc_01017652898121961272041674506241",
                "tracking_references": [
                    "15503566052622"
                ],
                "_links": []
            },
            {
                "reference": "sc_01017652898121961272041674506242",
                "tracking_references": [
                    "15503566052623"
                ],
                "_links": []
            }
        ]
    },
    "_links": [
        {
            "href": "https://api-int.sorted.com/pro/shipments/sp_01017652898121961272041674506240",
            "rel": "shipment",
            "reference": "sp_01017652898121961272041674506240",
            "type": "shipment"
        },
        {
            "href": "https://api-int.sorted.com/pro/labels/sp_01017652898121961272041674506240/pdf",
            "rel": "label",
            "reference": "sp_01017652898121961272041674506240",
            "type": "label"
        },
        {
            "href": "https://api-int.sorted.com/pro/labels/sp_01017652898121961272041674506240/zpl",
            "rel": "label",
            "reference": "sp_01017652898121961272041674506240",
            "type": "label"
        },
        {
            "href": "https://api.sorted.com/pro/documents/sp_01017652898121961272041674506240",
            "rel": "customs_documents",
            "reference": "sp_01017652898121961272041674506240",
            "type": "all"
        }
    ],
    "correlation_id": "3ba8481a-7dfc-49ab-8502-e58f98f8fac2.SAPI_28e18db6-2be3-45af-89d7-0e9bb72ae0f2",
    "details": [],
    "excluded_services": [
        {
            "carrier": {
                "reference": "FF_FedEx_2Day_977086833",
                "name": "FedEx 2 Day",
                "service_reference": "FF_FedEx",
                "service_name": "FedEx"
            },
            "exclusion": {
                "reason": "This service is not available for the selected collection/delivery dates.",
                "code": "ex_availability"
            }
        },
        {
            "carrier": {
                "reference": "FF_FedEx_2Day_ASR_977086833",
                "name": "FedEx 2 Day",
                "service_reference": "FF_FedEx",
                "service_name": "FedEx"
            },
            "exclusion": {
                "reason": "This service is not available for the selected collection/delivery dates.",
                "code": "ex_availability"
            }
        }
    ],
    "applicable_documents": []
}
Step 4: Get shipment labels
GET https://api.sorted.com/pro/labels/{shipmentReference}/{contentType}/{dpi}
When a shipment is allocated, the Shipments platform generates labels for each item of contents in that shipment. You can retrieve these delivery labels via the Get Labels endpoint.
The Get Labels endpoint takes shipment {reference}, {contentType}, and {dpi} as path parameters, where {reference} is the unique reference of the shipment you want to get labels for, {contentType} is an optional property indicating the file format required (either PDF or ZPL), and {dpi} an optional property indicating is the resolution required. Shipments API returns all package labels associated with that shipment as a base64-encoded byte array that decodes to the format and resolution requested.
For full reference information on the Get Labels endpoint, see the Get Labels page of the API reference.
For a user guide on retrieving labels, see the Getting Labels page.
Get labels example
The example shows a request to get PDF labels for a shipment with a {reference} of sp_00668400124857422605561635799040. The file data in the response has been truncated for clarity.
You will need to decode the file’s Base64 data in order to view or print the label. If you are unsure how to do so, see the MDN docs for more information.
GET https://api.sorted.com/pro/labels/sp_00668400124857422605561635799040/pdf
  {
  "file": (Base64 file data),
  "content_type": "text/plain",
  "document_type": "label",
  "dpi": 203
}
Step 5 (optional): Get customs docs
Get customs documents endpoint
GET https://api.sorted.com/pro/documents/{shipment_reference}
When shipping internationally, Shipments automatically determines whether customs documentation is necessary for a shipment, and generates documents where required. You can retrieve customs documentation via the Get Customs Documents endpoint.
The Get Customs Documents endpoint takes a shipment {reference} as a path parameter. If CN22/CN23 or commercial invoice documents exist for the specified shipment, then Shipments returns these documents as a base64-encoded byte array that decodes to a PDF document.
You will need to decode the file’s Base64 data in order to view or print the documents. If you are unsure how to do so, see the MDN docs for more information.
- For full reference information on the Get Customs Documents endpoint, see the Get Customs Documents page of the API reference. * For a user guide on retrieving customs documents and commercial invoices in Shipments, see the Getting Shipment Documents page.
Get customs documents example
This example shows a Get Customs Documents response for shipment sp_00670175533382557003917067812864. Shipments has returned a CN22 document.
GET https://api.sorted.com/pro/documents/sp_00670175533382557003917067812864
Get customs documents response
  {
  "file": {Base64 file contents},
  "content_type": "application/pdf",
  "document_type": "cn22",
  "dpi": 203
}
Step 6: Manifest the shipment
PUT https://api.sorted.com/pro/shipments/{reference}/manifest
Once you’ve created a shipment, allocated it to a carrier service and printed labels for it, you’re ready to manifest it. To manifest a shipment, use the Manifest Shipment endpoint. The term “manifesting” refers to collating, formatting and transmitting the shipment data to carriers.
The Manifest Shipment endpoint enables you to manifest an individual shipment. Once Shipments API has received the request, it attempts to manifest the specified shipment and returns a manifest_result containing a unique reference for the manifest item and details of the carrier and service that the shipment was manifested with.
For full reference information on the Manifest Shipment endpoint, see the Manifest Shipment page of the Shipments API Reference.
For a user guide on manifesting shipments, see the Manifesting Shipments page.
Manifest shipment example
The example shows a successful request to manifest shipment sp_00673267200365953327505217421312.
`PUT https://api.sorted.com/pro/shipments/sp_00673267200365953327505217421312/manifest`
  {
  "results": [
    {
      "reference": "ma_00673536672211162995858760007680",
      "carrier": {
        "reference": "XPDI",
        "name": "XPD International",
        "service_reference": "XPDISU",
        "service_name": "XPD International Supreme"
      },
      "message": "Shipment sp_00673267200365953327505217421312 manifested with XDP Worldwide successfully",
      "state": "manifested",
      "shipment_count": 1,
      "_links": [
        {
          "href": "https://beta.sorted.com/pro/shipments/sp_00673267200365953327505217421312",
          "rel": "shipment",
          "reference": "sp_00673267200365953327505217421312",
          "type": "shipment"
        }
      ]
    }
  ]
}